About this Review
If you’ve recently looked at buying a new GPS golf watch then you’ll know just how saturated the market has become. With so many makes and models to choose from and prices ranging from £100 to £700 pounds, it can be really difficult to find the right watch for you.
If you’re in the market for a basic golf watch that gives you on-course GPS information with a few extra handy features, and can be used off the course too, then at just over £100, the Shot Scope G5 might be worth considering.
In this review, I’ll tell you everything you’ll need to know about the G5 and share my own personal thoughts and opinions having used it over a period of several months. I’ll discuss how easy it is to set up, how comfortable it is to wear, how well its key features perform on the golf course, and whether or not I think it presents good value for money.
If after reading this article you decide to buy a G5, be sure to enter my exclusive discount code, ‘ANDYSGOLF‘ at checkout to save an extra 15%.
Exclusive 15% Off Shot Scope GPS, Lasers & Tracking
This Shot Scope discount code will save you 15% on all Shot Scope golf GPS watches and lasers, including Shot Scope H4, V5, X5, PRO L2, PRO LX, PRO LX+, PRO ZR and PRO L5. Available for use on all products, worldwide. No expiry date. If this code doesn’t work, please let me know.
Meet the Shot Scope G5
The Shot Scope G5 is an affordable and easy-to-use GPS golf watch that can be used both on and off the course.
Its key features include:
- 36,000 pre-loaded golf courses worldwide
- Distances to front/middle/back of green (in yards or meters)
- Hazard information to reach and carry bunkers/water hazards
- Layup yardages and distances to doglegs
- A digital scorecard
- 2+ round battery life
- Interchangeable colour straps
- General watch mode
Setting up the G5
Out of the box, the G5 is incredibly quick and easy to set up. All you need to do is attach one of the two watch straps to the casing, pop it on your wrist and switch it on. The device comes pre-loaded with over 36,000 golf courses and enough charge to last at least one full round, so technically, you could unbox and put it straight to use at the golf course immediately after delivery.
That said, I’d still recommend first connecting it to the Shot Scope app to check for firmware or course updates, and, giving it a full charge using the supplied USB cable. On the subject of charging, the G5 uses its own Shot Scope-specific cable (the same cable as the X5) and not a standard USB-C cable, so you’ll need to make sure you don’t lose it as no other cable will charge the G5. Whilst it’s not a big deal, the use of a non-standard cable is a bit of a minor inconvenience.
If you’d like to take a closer look at what comes inside the box, how to set the G5 up, and how to use it, check out the two videos below.
View video transcript
Introduction to the Shot Scope G5 GPS Watch
In this video we are going to unbox and take a first look at this. This is the brand new Shot Scope G5 GPS golf watch. Now this is an affordable GPS golf watch packed with features which retails at £150. Now I’ve put a link to the product page in the description below and I’ve also included my promo code which may or may not, depending on when you’re watching this video, get you 15% off of your purchase price. In this particular video we’re going to unbox and take a closer look at the G5. If you’re looking to find out more about the watch and its features, I’ve got a full overview video which I’ll link to in the card above and the description below. But for now, let’s take a closer look at what comes inside the G5 box.
Unboxing and Customization Options
Okay, so let’s unbox the Shot Scope G5. Now you’ll see in front of me I actually have three different boxes. Usually with the Shot Scope products you just receive one box, but this is because with the G5, Shot Scope now allows you to choose two different straps from a range of 12 colors and allows you to choose the case and color for the watch itself. So the watch itself you can get a case in either grey or black, and then when it comes to your two straps you can choose two colors from a range of 12 and there are some really, really nice colors in there, so there should be something to suit you both on and off of the golf course. You’ll see here I have gone for the Black Strap, which we’ll take a look at in a minute, and I’ve also gone for this midnight blue. In terms of the color of the actual casing for the G5, I’ve gone for black. So you could say I’ve gone for fairly boring colors, but there are some really exciting colors there to choose from. This ‘Build Your Watch’ feature is available on the Shot Scope website. It’s part of the process when you’re buying your device. I’ll put a direct link to that in the description below and I’ve also added my unique discount code in there which may or may not work and get you 15% off of your Shot Scope G5 or other Shot Scope products depending on when you are watching this video. So check the link in the description, make sure you enter that code at checkout to see if it works for you.
So we’ll come back to looking at these two straps in just a second, but let’s first of all take a look at the G5 box. So this is very much in keeping with the other Shot Scope products in terms of design. It’s a really nice, well designed package. To me it’s very Apple-esque, I always say that about the Shot Scope products, it’s fairly basic. But what I like about it in particular, what surprised me, is actually just how small it is and how lightweight. And that’s partly because presumably these straps are here and not inside the box, so that’s why it’s going to be smaller and going to be lighter. But less packaging is always a good thing in terms of the environment and also I think on the shelf this will look really, really nice in the Pro Shop. So let’s get this one open. I’m grabbing a little knife here and I’m just going to just slice along the back here and let’s see what we get inside the box.
Box Contents
So there’s a little plastic tray here and we’ll peel that out and we have a couple of different things here. So we’ve got presumably the charging cable and we’ve got the Shot Scope main watch here. And then I’ve noticed when I was pulling out, we also have the Quick Start User Guide here. Now if you’re familiar with other Shot Scope products, you get these little quick start user guides. They’re basically designed just to get you up and running, get you up to speed with the device and allow you to take out on the golf course and make sure you’ve set up properly. There is a full user guide here, you can scan the QR code. But with the G5, it’s designed basically to be taken out of the box, put together, and taken straight to the golf course. So you shouldn’t really need to probably do much with this, but I would always encourage you to look through it. You’ll see here we need to charge the watch before we play and download the Shot Scope app if you’re not a Shot Scope user already. You’ll need to download from the Google Play or the App Store and register for an account. You won’t need this with the G5 just to use it, but you will need this in order to be able to install firmware updates, to update the time whenever the clocks change, and also to update your course so get the latest course maps. The device does come pre-loaded with over 36,000 golf courses, so you can just take it and go and play. But if updates to the maps have been released, you’ll need to connect your device to the app in order to get access to them. But all the information is in this quick start guide, so I would take a look at that when you get a chance.
Charging Cable and Watch Design
In terms of the charging cable here, just having a quick look at it inside this packet, it looks to be the same as the X5 charging cable. So let’s have a quick look at that. So yep, it’s the exact same as far as I can see. So it’s USB into your wall for your power, and then it’s this unique Shot Scope sort of charging cable here. I did query with Shot Scope with the X5 why they had gone for this over Micro USB or USB-C, and the reason for that is to keep the device small. So you’ll see I’ve got the X5 here, it’s small and it’s lightweight. If they were to put another type of charging in there, and it would be considerably bigger and heavier, so this is probably not a bad choice. Let’s just take this out of the plastic packet. We’ll move that inside. So it’s incredibly light, I mean this is really, really light, and it looks—it actually looks like it’s the same casing pretty much from the—I don’t know if you can see—from the X5 there. And there at the back is where we connect the charging cable. So let’s just quickly clip that in. It’s a little clip and it’s pretty secure to be honest, and they’re never usually the longest of cables, but yeah, it clips in and it should hopefully charge without any issues. Let’s just be careful taking that out, so we’ll leave that for now.
Now the watch itself, this is not touch screen like the X5, so you’ll notice there are two buttons on either side. So we’ve got up, down, back, and select—that’s what we use to navigate through the watch. But it looks really nice. It doesn’t have the the fancy bezel that we’ve got on the X5 there, but this is designed to be a fairly basic watch, it’s designed just to give you GPS information. It still looks good and I’m sure once the straps are on, it’ll look even better. But it’s basically designed to give you that GPS information on the golf course but also be worn off of it. So yeah, it’s really light, looks really nice. I like that Shot Scope have gone with this circular approach to the watches and the other thing I quite like is it’s not too big and bulky. Sometimes with these watches these days they tend to be really big, they’ve also got lots of technology built into them and they just look a bit too big to be honest. But that that looks to be a nice size.
Attaching the Strap
So let’s—I’ll take my X5 off just now so that we can pop this on our wrist, but we’ll need to probably take one of these straps first. So this is the black strap here. Let’s open this one up and have a look. So we’ve got two straps as I said, this is a black one. Feels really, really nice, it’s incredibly smooth, very, very flexible and it’s made basically from—let’s have a look—it’s made from silicon with dust resistant coating, so hopefully it won’t allow all the dust or any sand on the golf course to stick to that. So let’s just peel this apart. And actually I’ve noticed whenever I’m pulling it, those little nibs on the bands here are clipping in place, so that’s designed basically to stop this strap from flapping about, which is great. So I think there’s there’s one on each of them actually, so that’s a really good thing to have. And the other thing that I’ve noticed with this is, unlike the X5 and the V3 which some users have claimed to be a bit frustrated about having the straps on what they deem to be the wrong way around (that’s because the technology for pin collect and for shot tracking is built into the strap here), this particular part of the strap with the buckle on it with the G5, because it doesn’t have shot tracking capabilities, it doesn’t have that technology built into the strap, and therefore presumably we can put the strap around this way or if you want to have a more traditional way we could have it that way there.
So let’s have a look at how we can connect the strap. So we’ve just got a couple of pins here and presumably we flick this up and then slide it across, there we go, and that hides one end. And then we’re going to just pop this into the watch. So let’s turn it over. So we’ve got a couple of little fixing holes there. Let’s give this a go. So make sure we do it the right way around, pop that into that hole there, make sure that is peeled in, and that’s it clipped in. And then I’ll just make sure I pop that down, so they can come loose. There we go, got one of them in. This one will fit that way around. Same thing, we’ve got a little pin here, let’s pop that. We’ll try and get this one in as well. So same as last time, putting the hole for one point—oops, I push that wee bit too far there—into there, and then let’s see if we can get that to pop in. It’s a little bit fiddly. The good news is it’s probably not the kind of thing you’re going to be doing very often. There we go, that’s it locked in. So we’ve now got the strap connected and now it looks a lot more like a watch. I’ve got a little bit of Shot Scope branding just here. But I really I’m really liking that strap, it’s nice and thin because obviously it doesn’t have the technology built in for collecting your strokes, and it feels really nice.
Initial Impressions on the Wrist
So let’s put this onto my wrist. The other thing I’ve noticed is it’s quite a long strap and there are a lot of holes here. Some users have mentioned in the past that if you’ve got quite large wrists they ran out of holes or the strap wasn’t long enough. I look like I’ve got a lot of holes either side here so I can’t see that being an issue, and if you do have particularly large wrists. But there we go, in position. So we’ve got it on, it feels it feels even lighter than the X5 to be honest. It’s only 42 grams which is incredibly light and that looks really good on the wrist. It’s not too big. There’s a bit of depth there, but in terms of its size, it doesn’t look too good for a big from a wrist. There we go. And you’ll see it’s actually already turned on and we’ve got the time displayed there. So it says it’s 3:58 on the 24th of January. Now that isn’t the correct time. I am—I know we’ll need to connect it to the mobile app in order for that to update, that’s how it works whenever you update when the clocks change. You basically just connect it to that. But it looks like we’ve got plenty of battery in there.
Navigating the Watch Menu
And let’s test out these buttons here. So we’ve got back button, down, up, and select. So select takes me into the main menu there. And let’s use down. So we can go through and you’ll see it’s really quite responsive. So the minute I’m pressing these buttons it is moving up and down which is great. The screen’s nice and bright, it’s a nice size as well and you’ll see it’s backlit as well. So it’s backlighting in, it will switch off after a couple of seconds just to preserve that battery, but it should be enough whenever we’re using it in your house or in the dark at home, or out in the golf course if you’re playing when it’s dark.
Settings and Demo Mode
Let’s let’s go down to settings. We’re going to settings. So the first option here is clock face. Let’s have a look at that. So we’ll go select and this allows us to change the clock face to different clock faces, very much like the X5, and I’ll go for that one. I quite like that. And then I assume we’ll just go back, there we go. Confirm score. So there’s an option on the watch to track your score as you play. It doesn’t track every shot like the X5 does, but it will allow you to use the digital scorecard built in just to track your score so you can see it as you play and at the end of your round. Let’s go down, see what else we have. We’ve also got a demo mode on this. So if I go to select, yep, that’s really good. So it allows me to see basically or show you what the screen is going to look like on the golf course. So we’ve got the distance in yards presumably to the middle of the green in large numbering there, and then we’ve got the front and back. So yep, front the green, back the green, middle of the green. Hole 18 is a par 4 in this case and the plus three that will be your collective score, your cumulative score for your round.
In-Round GPS Screens
Let’s go through and see what else we’ve got. So we’ll not end the demo. See if there’s anything more. This will be the hole and this will be the scored entry screen, so you’ll be able to enter your score so you can go up and down and it tells you the hole and the par. And this is the distance to the dog leg which is a really good addition. On the X5 I’ve used this quite a lot already especially in courses I’m not familiar with. It’s good to see how far you have to go into a dog leg. And then we’ve got the layup points there. So what yardage you need to hit to lay up to 150 or leave 200. And then we’ve got our hazards. So this shows you basically the location of the hazard. So if it’s on the right of the screen, the hazard’s on the right of the hole, and if it’s on the left, it’s on the left. It also shows you the distance to reach the hazard and to carry it. So we’ve got 45 to reach the water, 48 to carry it, 93 to reach the bunker, 98 to carry it. And if I go down, let’s see if we’ve got anything else. So that’s just gone through all of the demo. Let’s end the demo.
Display Options and Battery Life
Let’s go down, have a look at something else that I want to show you. We’ve got front middle and back layout. Let’s go into select this. And this is something that’s really interesting here: you can change the display for the screen when you’re playing. So if you just want to see the yardage to the middle of the green, you can change to this large display. So we’ve got the large center displayed, or we can have different ways of displaying that information. So this is going to appeal to people who maybe find a little bit difficult to see what the yardage is on the screen or if you just want to have it displayed at all times and quickly glance at it and see the yardage to the middle. So that’s really interesting. Let’s put that one on by going to select. And a couple of other things: units, so we can see we can change between yards and meters as you can always do. And let’s go into battery life. So straight out of the box, it’s got 83 percent. Now Shot Scope claim that you should be able to get two rounds out of this in its GPS mode, which is the only mode that’s available. And you should be able, if you’re using it as a general watch, to get 10 or more days out of it, which is really impressive. So that’s something I’ll obviously be checking out whenever I’m testing it and reviewing it, and I’ll report back on my review for this. But yeah, it’s good to see that it actually comes with some batteries, so if you do get one of these, you could take it straight to the golf course and just go out and play with it.
Final Impressions
So there you have it, that’s an unboxing and first look at the brand new Shot Scope G5. Personally, I think this will sell really, really well for Shot Scope. It’s packed with features, it’s affordable, and it’s going to appeal to those who are looking for the reliability of a Shot Scope product but perhaps not too fussed about the performance tracking that some of their other products provide. If you’re interested in finding out more about the G5, as I said, I’ve got a separate video giving you a full overview, or you can hit the link in the description below to visit their main product page. Just remember there is that handy promo code which may or may not work and give you 15% off. Next up, if you want to find out how the Shot Scope G5 performed out on the golf course, I’ve got a full review video which you can view just here.
View video transcript
Introduction to the Shot Scope G5 Tutorial
The Shot Scope G5 is a brand new GPS golf watch from Shot Scope, and it is incredibly affordable at only £150. I’ve put a link to it in the description below and also included my discount code, which depending on when you watch this video may or may not get you 15% off. In this particular video, we’re going to be looking at how to set the G5 up and how to use it out on the golf course. If you’re looking to find out more about the G5 or view an unboxing video, I have a couple of separate videos which I’ll link to in the description. Now in this particular tutorial, we’ll start off by looking at how to connect the strap to the watch’s casing, and then we’ll take a look at setting up the G5 using the Shot Scope mobile app. From there, I’ll then show you all of the options and settings that you’ll need to know about when you’re using the watch in general watch mode, and then we’ll finish up by looking at how to access the golf mode on the watch and all of the settings, features, and functionality that you’ll need to know how to use out on the golf course.
Attaching the Straps
Before we can get out and use the G5 on the golf course, there are a couple of little things we need to do in terms of setup. The first is attaching the straps, as they are not connected to the watch casing out of the box. I’ve got the Black Strap here, and you get a couple of different straps with the device when you buy it. To fix the strap onto the device, turn the watch over to see the pinholes. You need to take the pin that runs through the strap and connect it to the watch. Slide the small marker pin across to the left-hand side into the space here, and this should make it easy to connect the pin into the watch’s holes. Keep that little marker pin across on the left-hand side, and then you’ll hear a click. All you need to do is take that pin and just push it down so it sits in that little gap there. Do the exact same with the other strap: listen out for the click and then push it down. So there we have the strap connected to the device.
Setting up using the Shot Scope Mobile App
Once you’ve connected the strap to your Shot Scope G5, you’re ready to take it out and play golf. You can go straight away to the course; you can basically press the top left button to skip this screen that you see here. The watch is pre-loaded with golf courses, so you can go out and play and it should find your course no problem. But the benefit of connecting it to the Shot Scope app (which can be downloaded from the App Store or the Google Play Store) is that you can check for firmware updates or updates to course maps. I always prefer to do this stage the first time I use the watch before going out to the golf course. I’ve downloaded the Shot Scope mobile app and already logged into my account. If you don’t have an account, you’ll just need to register. We’re going to tap on “Connect Device” just at the top here. Providing I have Bluetooth switched on on my phone and the device nearby, it will try to pair them together. You’ll see it comes up, and you are asked to pair them. We’re going to type in that code here, 243008, and then I’ll tap on the pair button. It will take me into this menu where we can select our device, the Shot Scope G5. We’ll tap on “Continue” and then it checks for firmware updates. In this case, the updated firmware on the device is the latest, so we’re all good. If there was a firmware update, it would ask you to do it just now. We’ll then tap on “Continue” and go through some settings for our device. I’m happy with 24-hour time settings, but you can change it to 12 hours if you want. Then you can choose between yards and meters; I’m going to go for a yard. There is a little tutorial you can go through here which explains how course maps work. I’m just going to skip that one. Then I’m going to check if I have any updates for my golf course. I have some courses already subscribed. If I go to “Ready to Sync,” this is where you can see all of those courses which I’ve subscribed to. If it has a red exclamation mark, it means an update is pending. I’m going to look for my Dunferman golf course here, and you’ll notice we have an update available. I’m going to tap on “Tap to Sync,” and it will just synchronize this with my watch so I’m getting the most up-to-date course map on the device. Now that we’ve done that, all we need to do is tap “Finish Setup,” tap “OK,” and you’ll see the watch will do a quick little reset, and then we have the current time and date displayed on the watch.
Navigating the Watch using its Buttons
Now it’s time to take a look at how to set up and use the watch in general watch mode. The Shot Scope G5 has four buttons on the outside: Up and Down on the left-hand side, and Select or the menu button and the Back button on the right-hand side. On the bottom left-hand corner, you’ll see that we have a little lock symbol. The watch has two locks: you can lock it if you’re using it in general watch mode or if you are using it in golf mode. If I try and press any of these buttons when locked, the watch remains locked. If we press the bottom left button, it unlocks and we can make use of these buttons.
Enabling/Disabling Button Lock
Because I never seem to accidentally access the watch’s menu even when I don’t have the lock active, I prefer just to disable this feature. To disable the lock, make sure you’ve unlocked the watch and then press the top right button. Use the bottom left button to go down to Settings, then the top right button to select Settings. We’re going to use the top left button to go up to Button Lock. Again, we’ll use Select at the top right, and you’ll see you can set up the button lock for clock face or for golf mode. I like to disable it for both of these, so I’ll use the Select button to go into Clock Face, then go down to Disable, and use Back. We’ll do exactly the same for Golf Mode, down to Disable, and Select, and then go Back. This means that the watch is now not going to automatically lock. Now that we’ve disabled that, all of the buttons will work when we press on them.
Changing the Clockface
The next thing we can do with the Shot Scope G5 when in general watch mode is change the display we see here (the time and date). If we press Select and then go down to Settings, then Select again, this time we can go into Clock Face using Select. You’ll see you can use the Up and Down options to navigate through the three different clock faces. I’m going to go for the analog look with the time displayed up above. All we do is press Select, and then press Back a few times, and you’ll see the clock face has now updated.
Updating the Time/Date
A couple of other things you can do with the G5 that you can’t do on the other Shot Scope devices is actually update the time using the device rather than having to connect to the app. To do so, you’ll see here we’re in 24-hour format. If I press Select and then go down to Settings, back into Select, we’re going to go down and we’re going to look for the Time menu. Here it is here, let’s go into that one. You’ll see here you can set the time. If you use Select, we can change the hours and minutes. You basically just use the Select button to move across and then Up and Down to adjust the hours or minutes. When you’re done, all you do is press Select again and Select again to confirm. Then you can go down to set date and do the same thing with the date. Or you can use the Back button to go back. If I go to Format, this is where you can change it between 24 hours or 12 hours. Let’s change that, press Select, we’ll go back, back, and you’ll see that little time at the top has now changed to the 12-hour time.
Enabling Digital Scorecard
Another few options that are worth knowing about if I go to Select, back into the menu, so let’s go down to Settings. One of the ones that’s quite important is Confirm Score. The G5, when used in golf mode, allows you to track your score, but if you go into this menu and Select and down to Disable, then the watch will not allow you to track your scoring. So, if you’ve disabled this when you’re going to start your round, you won’t get the option to enable scoring—it just won’t be active. I would make sure that you have this enabled because you can actually choose when you start your round if you want to have scoring active or deactivate it in that menu, but you can’t enable it if you have disabled it from here. That’s a quick run through of how to use the Shot Scope G5 in general watch mode and a couple of the settings that I think are important to know about.
Starting a New Round
Now that we’ve covered how to use the watch in general watch mode, let’s talk about how to use it in golf mode. The G5 is designed to have all of the golf courses (over 36,000 worldwide) pre-loaded on the device, so you shouldn’t actually need to do anything when you arrive at your golf course. If you want to start your round with the device, all you need to do is press the Select button at the top right, and then simply go into Play Golf. The watch will now try to locate any nearby golf courses. This should take around 30 seconds at the most. You’ll see here I have two options: the main golf course and the small course. I’m going to go back up because I want to use the main golf course, and then we press the top right button to Select. Now, it asks me which Tees am I going to use. I’ve got a mixture of gold, yellow, purple, and white. I’m going to go for the purple set, which I defined for the course, and press Select. Then you’ll see I’ve got the scoring option. If you leave it enabled in the general settings, then you have the choice here to disable scoring or to have it switched on for your round. I’m going to leave it on and then press Select.
Golf Mode Screen Overview
Then you’ll see here we get the GPS information to the hole, which is the first hole on the golf course. At the very top, underneath G5, you’ll see the current time and your battery. In large blue writing, you have the distance to the middle of the green on the hole you are currently playing (in yards). Below that, on the left-hand side, you have the distance to the front of the green, and then the distance to the back of the green. Below that, “H1” stands for Hole One, “P4” stands for Par Four, and the “E” is your cumulative score so far to par. If we want to go into the main menu for the watch, all we do is press the top right button.
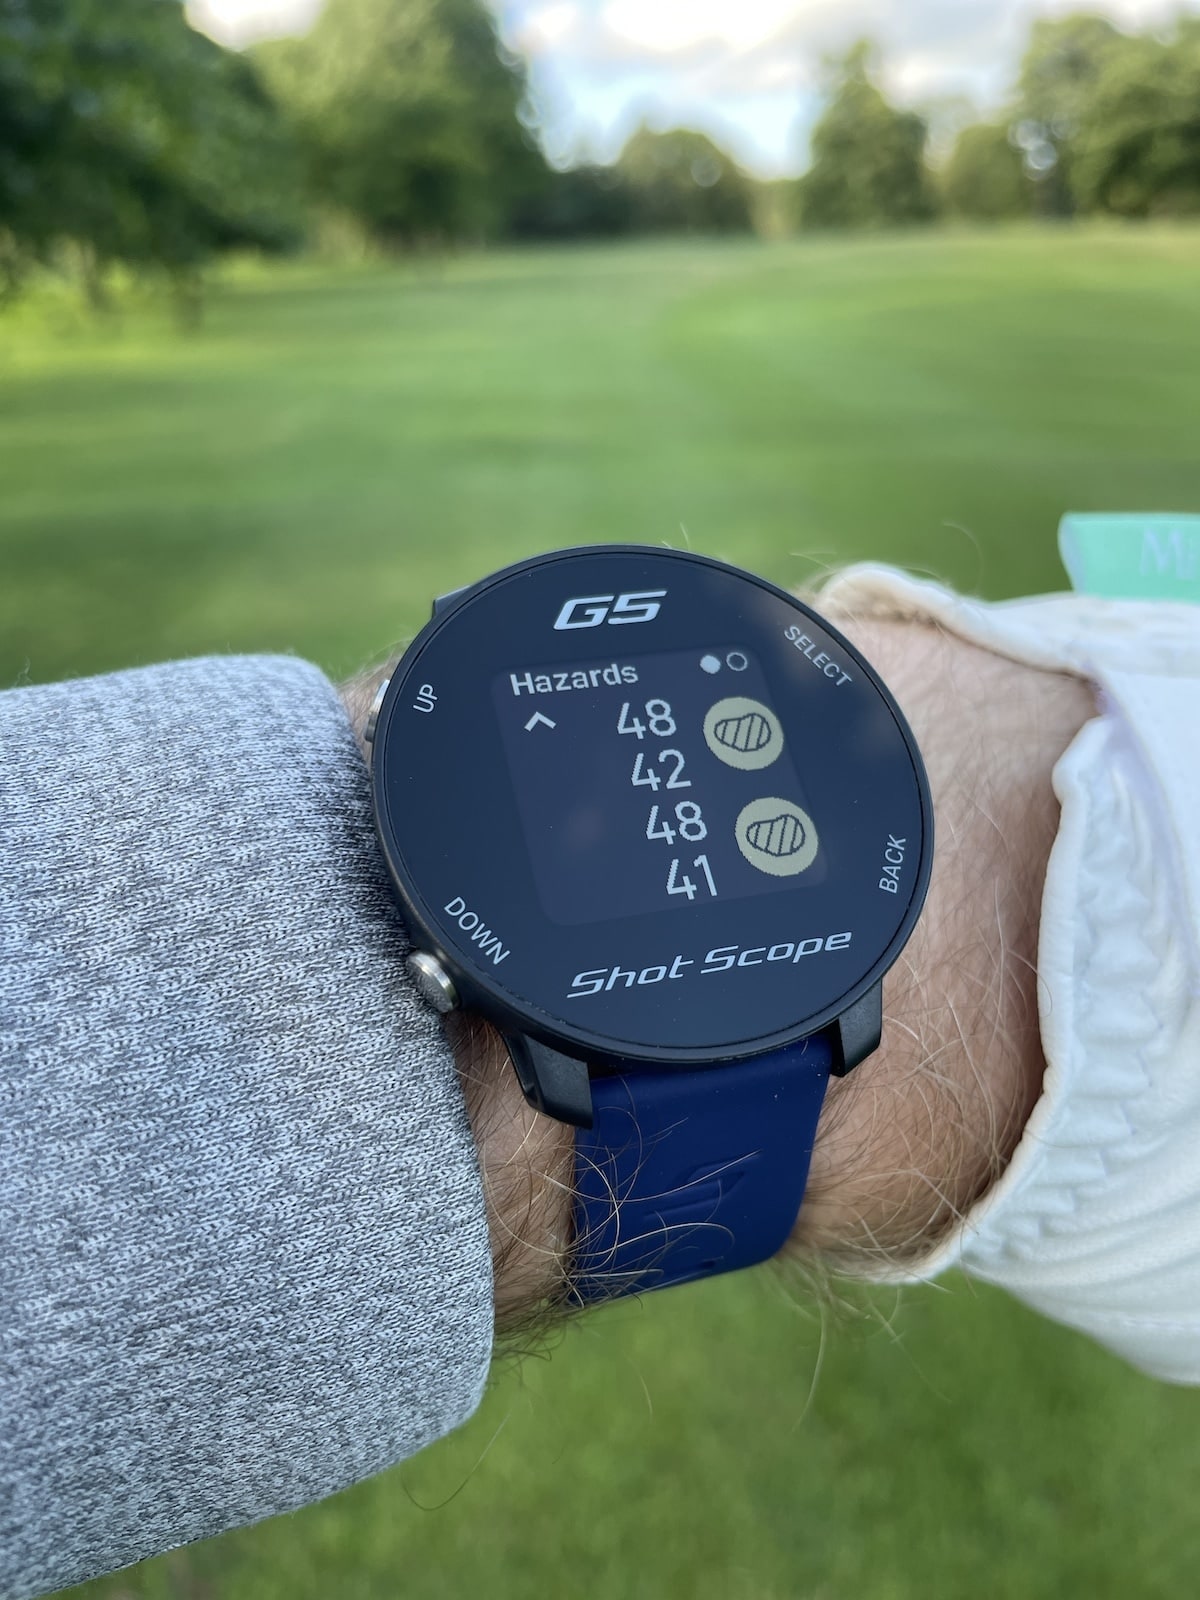
Viewing Hazards, Layup Distances, and Doglegs
A couple of things that you might want to do when you’re actually out on the golf course is look at hazards on the hole you’re playing or various layup points. You can get to this by pressing the bottom left button when you’re in this view here. You’ll see here we can see the hazard information. The bottom number is the distance to the hazard, and the top number is the distance to clear the hazard. The location of the hazard will be dictated by the side of the screen it is on. If you want to see if there are any other hazards, you can press the Up button. Interestingly, there is a slight difference between some bunkers: one has a hash line through it and one doesn’t. That means that the bunker to the side of the green has a hash line, so greenside bunkers will have a hash line in them, and normal bunkers won’t. If you want to see layup information for the hole you are playing, all you do is press the Select button (top right), and you’ll see the little white circle moves to the next one along. This now shows you layup information: the yardage you have to hit to leave yourself 100 yards in, and the distance you’ll have to hit to leave 150 yards in. If you press Select again, you will see the dogleg information for the hole you are playing. Just to reiterate, you use the Select button twice or three times to move between hazards, layup, and doglegs.
Changing the Front/Middle/Back Distance Display
Now you can actually change the way that the numbers are displayed. If you want to have just the center yardage displayed, you can press the Select button at the top right, and then keep going down using the bottom left button to the Front Middle and Back Layout. You can then press Select and choose to have it displaying just the center distance or have it displayed in different ways. If we go for just the center distance, press Select, you’ll see it displays it just like that, so we can’t see the yardage to the front or to the back of the green. To change that back, we simply go Select, then go back down to Front Middle and Back Layout, and choose another one.
Entering your Score using the Scorecard
When you reach the green, the watch’s display will automatically change to ask you to enter how many shots you have taken. You’ll use the left-hand buttons (Up or Down) to increase or decrease the amount of strokes, and you’ll use the top right button to confirm the number of strokes. Once you confirm the number, the watch will automatically move on to the next hole.
Switching to a New Hole
If for any reason the watch doesn’t automatically move on or if you want to jump between holes, you can press the Select button (top right). You can then go into the Change Hole menu by pressing Select again. From here, you can use the Up and Down buttons to move to a different hole (e.g., hole number seven) and then press Select.
Viewing and Editing Your Scorecard
Another thing you might want to do is check your score or make changes to your score. Press the Select button to go into the menu, and then go down to Scorecard, which is just located here. We’ll then press Select. From here, we can work through our holes. Press the Select button at the top right on a hole, and then use the Up and Down buttons to enter our score. Once you confirm, go down to the next hole. As we work through these holes, the screen actually displays your score to par for the hole on the left-hand side and displays your entire score at the top.
Checking Your Battery Level and Last Shot Distance
A couple of other things you might want to know about when you’re using the watch on the golf course: the first one is checking the battery level. If you go to Select, we can go down to our Battery menu. If you’d rather see an actual percentage of your battery level remaining, go into the Battery Level and press Select. The second thing is measuring your last shot distance. Press the Select button, then go down to Last Shot and press Select again. When you have hit your shot, simply press the Select button, and you’ll notice a yardage will appear. You can then walk to your ball, and by the time you arrive at the location of where your ball is sitting, it will tell you how many yards you have walked and therefore how far you’ve hit your shot. At any point, you can actually reset this by simply pressing the Select button here.
Ending Your Round
As you’re playing, you may be interested to know how long you have been playing for. You can press the Select button, go into the menu, and then go down into Round Time and press Select. You can see your total round time and your total score displayed just down there. Once you finish your round or if you want to finish your round early, you can go up to End Round and press Select. You’ll see in here you have the option to go down to Continue your round, or if you actually do want to finish your round, you can use the Yes option. Press Select to go into Yes, and it will tell us our total round time and our total score. All we do from here is press Back to get back to the main menu and then back again to go back to the main watch display.
Looks, fit and comfort
Given it’s cheaper price point, the G5 wasn’t designed to be an all-singing, all-dancing golf watch, nor was it released to compete with Shot Scope’s premium X5 model. Instead, it was primarily designed for golfers looking for a basic and affordable option. With the G5, you’re not going to get a fancy touch screen, performance tracking, or an visual of the hole you are playing, but that’s to be expected at just over £100. The display is a little rudimentary and navigation is done using the four buttons on the outside of the casing. Whist some users may find this a little dated, the use of physical buttons actually helps to make the device incredibly quick and easy to navigate, and useable in wet weather conditions, where some touch-screen devices can struggle.
Personally, I don’t think the G5 is quite as pretty as the X5 and it’s not going to win any awards for its looks. However, visually, it is a huge improvement on the rather retro looking Shot Scope G3, and I do think it has a nice modern look to it.
At only 42g, it’s so light and comfortable to wear I genuinely forget it’s on my wrist most of the time and it never feels like it interferes with my swing. The silicone straps are comfortable, lock securely in place thanks to the buckle and loops, and are long enough for even those with the thickest of wrists.
Speaking of straps, when buying the G5, you get a choice of two straps from a range of 12 colour options – so you really can mix and match your watch with your outfits and personality.
ON-COURSE PERFORMANCE
Initiating a round on the G5 requires a couple of button presses and only takes around 30 seconds of obtain a GPS connection. The process is so quick and easy I usually start my round whilst standing on the first tee.
Once a round has started, the G5 displays distance information to the front, middle and back of the green on the hole you are currently playing. Distances are dynamic, meaning that they update as you walk closer to or further away from the hole. You can choose to display the distance information on the watch in yards or meters using the watch settings menu. In my experience using the G5, the distance information always updated quickly and I’ve been given no reason to be concerned with its accuracy. Anytime I have compared numbers with on-course marker posts, laser rangefinder readings, or playing partners’ yardages, they’ve always checked out.
Even though the screen resolution is only 176 x 176 pixels, it is bright, vibrant and easy enough to read in varying lighting conditions. I’ve yet to play a round with the G5 where I struggled to read the display in bright or dull conditions. Even when it has started to get a bit dark, the GPS information is still easy to read thanks to the backlit screen.
Although visually the display is quite simple, Shot Scope has done well to fit so much information onto the screen, somehow managing to do so without it feeling cluttered. The standard golf-mode watch screen displays the time, battery life, distance to the front, middle and back of the hole you are playing, hole number, its par, and your cumulative score to par (if scoring is enabled – more on that shortly) all at once. I really like how the distance to the middle of the green is displayed on its own line in larger blue text, making it quick and easy to read at a glance.
The G5 also has two other display views, so if you don’t like the layout of the standard display, you can switch to either show less information on the screen (middle distance only) or show the same information as the standard display but in a different layout.
As well as distance information for the hole you are currently playing, the G5 also has a handy Hazard which shows the location and distance to reach as well as carry bunker and water hazards on the current hole. Better yet, this menu also contains layup information so you can see exactly how far you have to hit your next shot in order to leave yourself 100/150/200 yards to the centre of the green. I find this feature to be particularly helpful when playing longer par 5s where I want to layup to a specific yardage, for example, 100 yards from the green.
Another feature that’s quite interesting is the Last Shot option which allows you to measure how far you hit your last shot. Whilst this data is not logged for performance tracking like it is with the Shot Scope X5, it can still be fun to know how much further you’ve hit your driver than your friends.
In terms of course management, if the hole you are playing has a dogleg, you’ll also be able to see the distance to this within the Hazard menu. This is a particularly useful feature for tee shots or blind approach shots on golf courses that you are perhaps not so familiar with.
As if all of these features weren’t enough already, the G5 also has a built-in digital scorecard. Whilst this is quite basic and requires manual input after completing each hole, it is a handy addition and let’s you keep track of your score to par on the main screen during your round
The only drawback is that your scores are not tracked within the Shot Scope app, so once you finish your round, your score will be wiped. Also, the scorecard can only be used for strokeplay scoring and not stableford, which some of you may find a little disappointing.
Even though the screen resolution is only 176 x 176 pixels, it is bright, vibrant and easy enough to read in varying lighting conditions. I’ve yet to play a round with the G5 where I struggled to read the display in bright or dull conditions. Even when it has started to get a bit dark, the GPS information is still easy to read thanks to the backlit screen.
Battery life
Shot Scope suggest that the G5’s battery will last for 2+ rounds from a single charge when used in GPS mode (golf mode), and 10+ days in general watch mode. I’ve only tested its battery life over two rounds from a full charge once but it passed with flying colours. This isn’t something I’m usually too concerned about anyway as I only play two rounds on the same day once in a blue moon, so as long as the watch can handle a single round without any issues, that’s good enough for me, and, in all honesty, is probably good enough for most golfers too.
I’ve not yet specifically tested how long the battery lasts over a prolonged period of time in general watch mode, but it easily manages several days on a single charge, so no real concerns there either.
PROS and CONS
Let’s take a closer look at some of the G5’s good and bad points.
Pros
Really competitively priced at just over £100
Has most of the main features amateur golfers need in a golf watch
Quick and easy to set up and use
Free updates with no on-going subscriptions
Lightweight, comfortable to wear and customisable (straps)
Decent battery life (2+ rounds from a single charge)
Shot Scope own mapping so can fix issues or map courses within 48 hours
Shot Scope support is generally excellent
Cons
A little basic in terms of appearance and lacks the premium feel offered by some other watches
Doesn’t display hole/green map overviews
Scorecard isn’t tracked within Shot Scope app so scores are lost after ending round
Summary
If you’re looking for a budget golf watch that allows you to show off your personality and comes with all the main features you’re likely to need on the golf course, then the G5 presents a great option. At just over £100 with my discount code, it’s relatively inexpensive yet offers more features than some of the other slightly more expensive watches currently on the market. Given there are no on-going subscription fees, once you’ve purchased the G5, you’ll not need to spend another penny but will still benefit from free firmware and course updates. It’s easy to set up and use, reliable, and the Shot Scope support is up there with the very best in the industry – so you’re in safe hands with the Shot Scope G5
Exclusive 15% Off Shot Scope GPS, Lasers & Tracking
This Shot Scope discount code will save you 15% on all Shot Scope golf GPS watches and lasers, including Shot Scope H4, V5, X5, PRO L2, PRO LX, PRO LX+, PRO ZR and PRO L5. Available for use on all products, worldwide. No expiry date. If this code doesn’t work, please let me know.
Thanks again for checking out this review. If you have any questions about the G5 or any other Shot Scope products, drop them into the comments area below and I’ll get back to you as soon as I can.